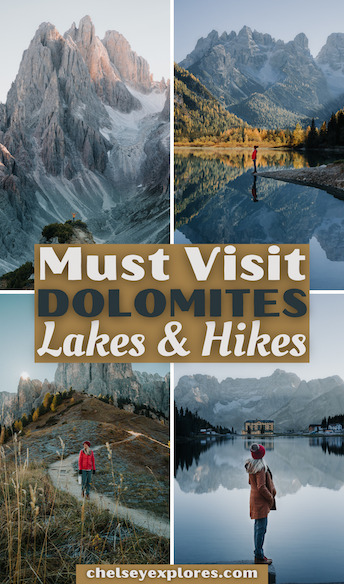
THE ULTIMATE 5 DAY DOLOMITES ROAD TRIP ITINERARY
Summary: A breakdown of my day by day Dolomites road trip itinerary plus my suggested packing list.
The Dolomites in Italy had always been on my bucket list after seeing pictures of the mountains all over Instagram. I wasn’t quite sure what to expect, but after visiting, the Dolomites quickly became one of my favorite places in the world.
Because I love this place so much, I wanted to share my ultimate 5 day Dolomites road trip itinerary with you. In this guide, you will find all the information on where to stay, what to see, and even my suggested Dolomites packing list.
This itinerary is also perfectly suited for the outdoor adventurer and photographer!
I have been to quite a few mountainous areas like Colorado, New Zealand, Montana, and much more!
PLANNING THE ULTIMATE DOLOMITES ROAD TRIP: ESSENTIAL THINGS TO KNOW
The Dolomites are a dramatic mountain range located in Northern Italy close to Austria and Switzerland. In the quaint towns within the region, you will be surprised to find Austrian-inspired architecture as the Dolomites were actually part of Austria at one point before they became a part of Italy.
There are some essential things you should know prior to planning your Dolomites vacation.
HOW TO GET TO THE DOLOMITES
Getting to the Dolomites can be a little difficult as it is quite remote, but don’t let that deter you from visiting. I am here to help you plan this trip and to make it as smooth as possible for you!
As you will find below, the Dolomites is best explored by car as many of the locations are spread out and public transportation is not easily accessible here. First, let’s talk about what airport you need to fly into.
So, how did we personally get to the Dolomites? We had been exploring Italy for two weeks prior to visiting the Dolomites, so for us, we needed to figure out the best spot to go from.
And that was Venice. Here is exactly what we did.
First off, did you know Venice does not have any cars? Everything is done via a water taxi. So, we left our Airbnb in the morning and took a water taxi from our Airbnb to the Marco Polo Venice airport. Once we arrived at the airport, we rented a car and drove for 3.5 hours to the Dolomites region.
After much research, we went with Budget car rentals and chose a small SUV for our Dolomites road trip. The final cost came out to around $500 for 5 days of a car rental.
Tip: European cars tend to have smaller trunks than American cars. If you are anything like us you packed a lot for this trip but don’t want to take it all with you to the Dolomites. There are storage lockers in Venice that cost around $65 for the 5 days.
Another great option would be to fly into Milan, rent a car, and drive four hours to reach your destination. Northern Italy can be reached by multiple airports, but regardless of which airport you choose you will need to rent a car and drive to your end destination in the Dolomites.
Below you can find the driving times from the surrounding airports:
Budapest, Hungary-9 hours
Milan, Italy-4 hours
Munich, Germany-3-4 hours
Zurich, Switzerland 5-6 hours
Venice, Italy- 3.5 hours
BEST TIME TO VISIT THE DOLOMITES
Honestly, the Dolomites can be visited at any time of year, but personally, I think the best time to visit is in the Fall season. Let’s talk about why below.
In the winter, this area becomes a huge ski region, therefore if you are not into skiing then this might not be the best time for you. Although the snow-capped mountains are probably gorgeous I would say there is not much to do other than ski during the winter.
Visiting in the Fall allows you to still be able to hike the mountain ranges as well as experience the glory of all the Fall colors. During this season, you will most likely find fewer crowds, great weather, and “off-season” prices.
For your best chance at seeing Fall colors, I recommend visiting in October. We visited October 15th-19th and the colors were just starting to pop.
Do note, the Dolomites region is essentially a tourist town. If you choose to visit in the off-season you may find a lot of the hotels and restaurants have already closed for the season and don’t re-open until ski season begins.
This doesn’t mean you can’t visit during that time of year, it just means you may have to pack a few extra snacks for your hikes and day trips.
HOW MUCH TIME TO SPEND IN THE DOLOMITES
Man, I could spend forever in the Dolomites haha. This mountain region was so magical to me and there are a never-ending amount of lakes and mountains to explore. BUT, if we must narrow it down, then I recommend spending anywhere between 5-7 days here.
Our trip was basically split up into two main regions: Ortisei and Cortina D’ Ampezzo.
THINGS TO KNOW BEFORE VISITING
-There are a lot of tolls on the major highways, so be prepared to pay for these. Credit card is accepted
-There are a lot of speed cameras. Our rental car actually beeped and warned us when a speed camera was coming up.
-Most people speak English here, so it was fairly easy to get by
-If you are visiting the off-season a lot of the refugios, hotels, and restaurants will be closed for the season.
-Although there are a ton of beautiful hotels with insane views, we opted to stay in Airbnbs as those were definitely the more affordable options
-It can get quite cold being high up in the mountains, so make sure to check out my packing list below.
-The Euro is the currency used in the Dolomites, but we found most places accepts card
SPECIFIC TIPS FOR DRIVING IN THE DOLOMITES (Seiser area)
-It is forbidden to drive in the meadow region of Seiser Alm
-If driving in the Seiser Alm region, you can only drive before 9am and you can’t go any further than the main parking lot in Compatsch.
-You can’t drive up the roads between 9am-5pm; however if you arrived before 9am you can drive down any time you want
DOLOMITES ROAD TRIP ITINERARY DAY BY DAY
Alright, let’s get to it! I hope you use this Dolomites road trip itinerary to help you plan your trip and have the time of your life!
Below I will discuss the highlights that you shouldn’t miss. For your first two nights, you will be staying in the town of Ortisei.
DAY 1 OF YOUR DOLOMITES ROAD TRIP
The first day of your Dolomites road trip itinerary is all about driving to your destination. Most of your morning and early afternoon will consist of picking up your car and driving to your destination.
You will be staying in the town of Ortisei. Your first day is what I like to call the “let’s get settled in” day. So, you will only be making one stop this day.
I recommend stopping for lunch somewhere in town and then grabbing some groceries prior to seeing your first Dolomites attraction.
Stop 1: St. Valentin Church
This church can be easily accessed via a short walk. There are two routes to get to this chapel.
Either begin near the village center of Seis and look for a brick-paved path that winds up the hillside toward the chapel. You will come across another path carved under a row of trees that brings you to the chapel steps.
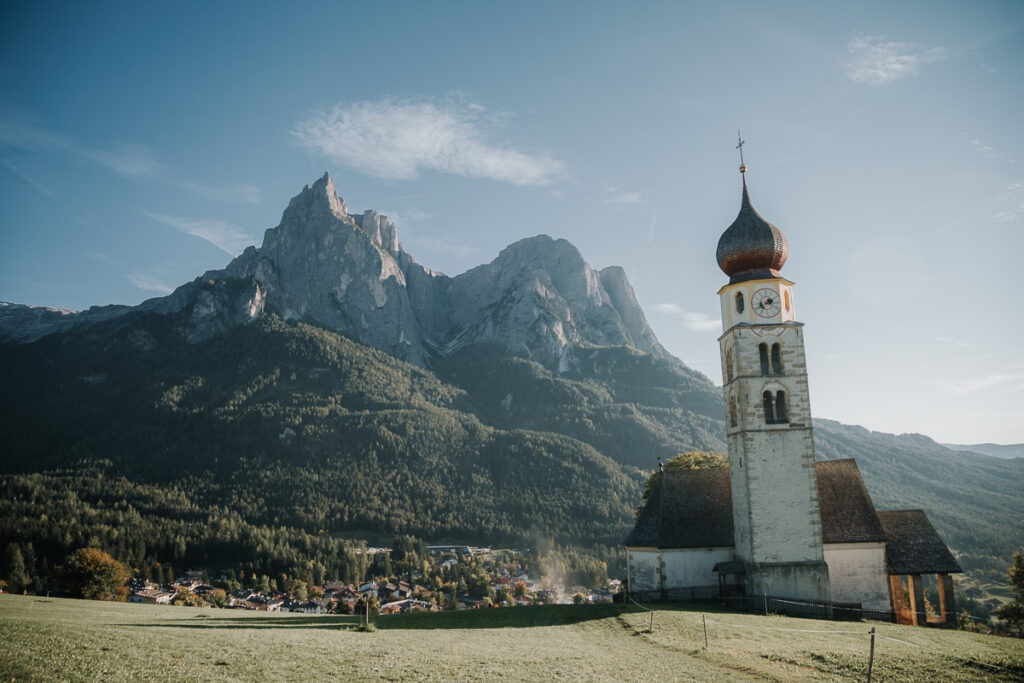
Or if you want an even shorter option drive to the destination, find a place to park along the road, and just walk to the chapel. There are areas that are fenced off, so please remember to follow the LNT principles and avoid those areas.
Stop 2: Malga Sanon
If you are looking for a great sunset location then I recommend your next stop being Malga Sanon. We were able to drive directly to this location. There is a refugio here where you could normally grab something to eat, but it was closed when we visited.
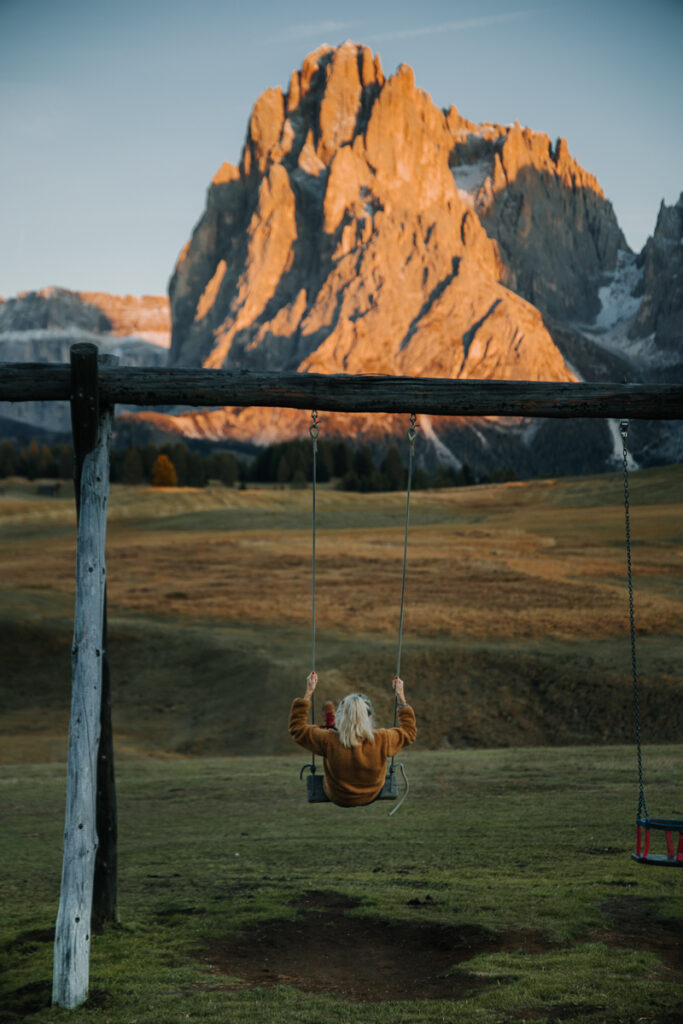
Here you will find a tiny playground with a swing. I have never swung on a swing with a more gorgeous backdrop. See the picture below.
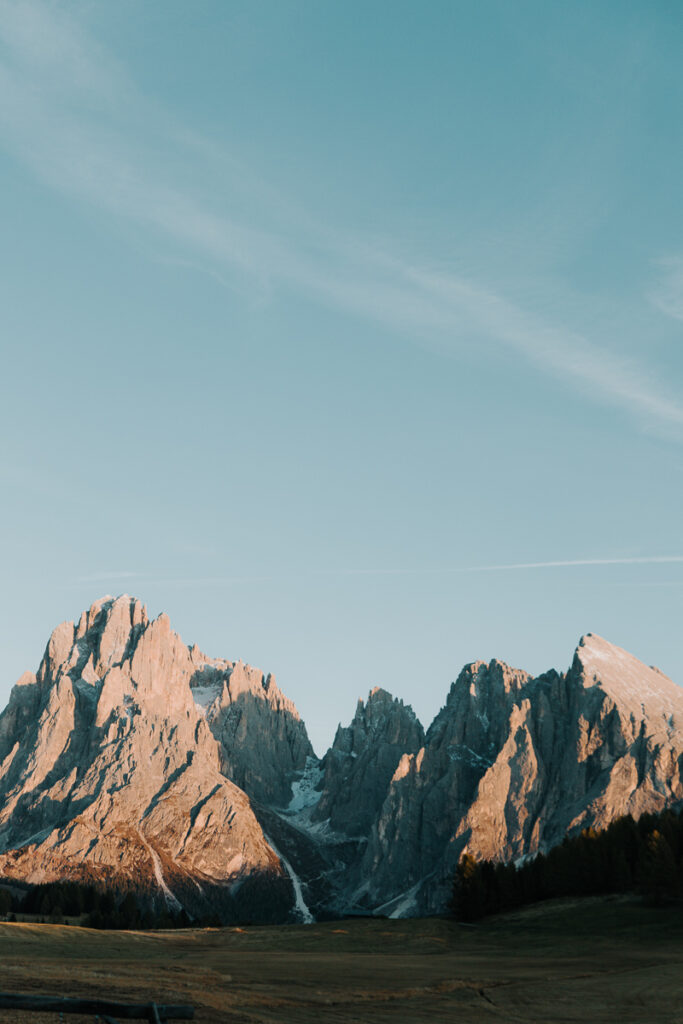
Optional Stop: Lago Di Carezza
If you have additional time, I recommend stopping at Lago di Carezza. We, unfortunately, ran out of time and were not able to make it here, but the pictures look gorgeous. It is about 30 minutes out of the way.
If you are coming from Venice, then I would recommend making this stop first. This lake is often called “Rainbow Lake” due to its extravagant colors. This entire lake is now fenced off, so again please respect the LNT policies and do not hop the fence for a better picture.
Our accommodation for the night was in a cute Airbnb in the town of Ortisei. We split the cost with another couple we were traveling with.
DAY 2 OF YOUR DOLOMITES ROAD TRIP
Our original plan was to hike Seceda, but because we were visiting in the off-season the Gondola to get here was closed-meaning we would have had to hike about 9.5 miles. Although I am up for a good hike, I happened to be 23 weeks pregnant during this trip and that didn’t sound all that fun to me.
I have heard this hike is quite steep and can be cold, so if you choose to do it make sure you pack enough layers and lots of water!
Stop 1: Gondola the hike to Saltria
We chose to take the Mount Seuc Gondola located right in the town of Ortisei to the top and from there we began a different hike.
There were multiple hiking route options once we reached the top: we chose to hike to Saltria. The signposts give you an idea as to how long each hike should take.

The hike to Saltria was gorgeous and mostly downhill the whole way. Once we reached the town of Saltria we found a refugio that was open for lunch, so we refueled our bodies with some bratwurst before beginning the uphill trek back to the Gondola.
Stop 2: Val Di Funes
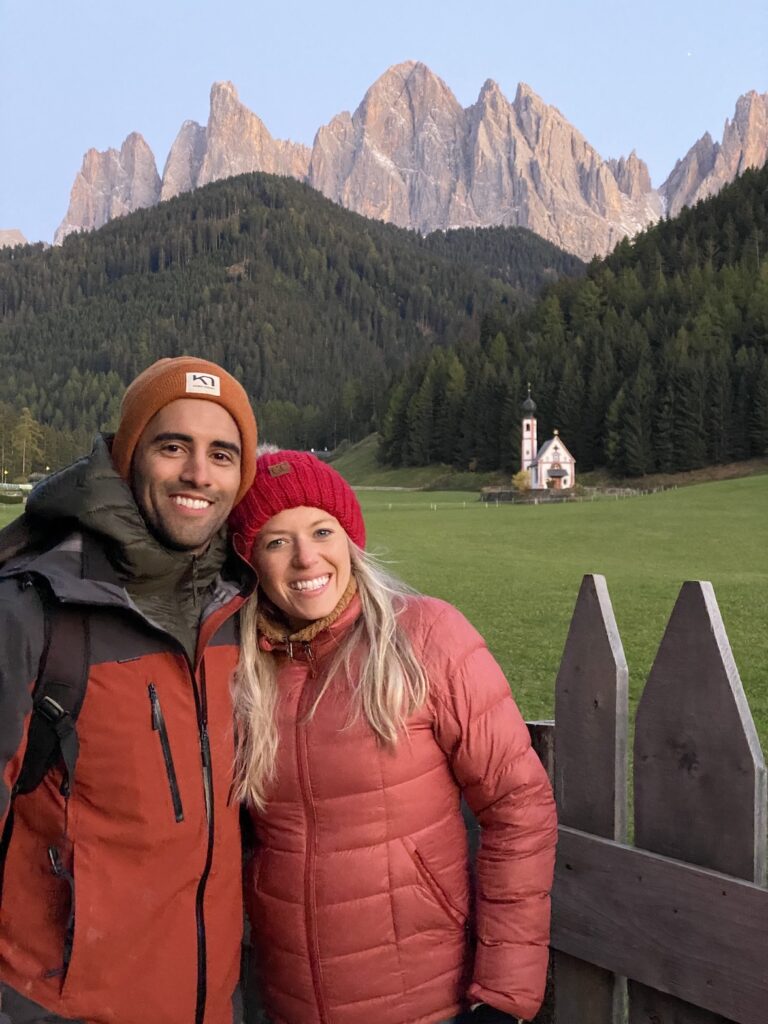
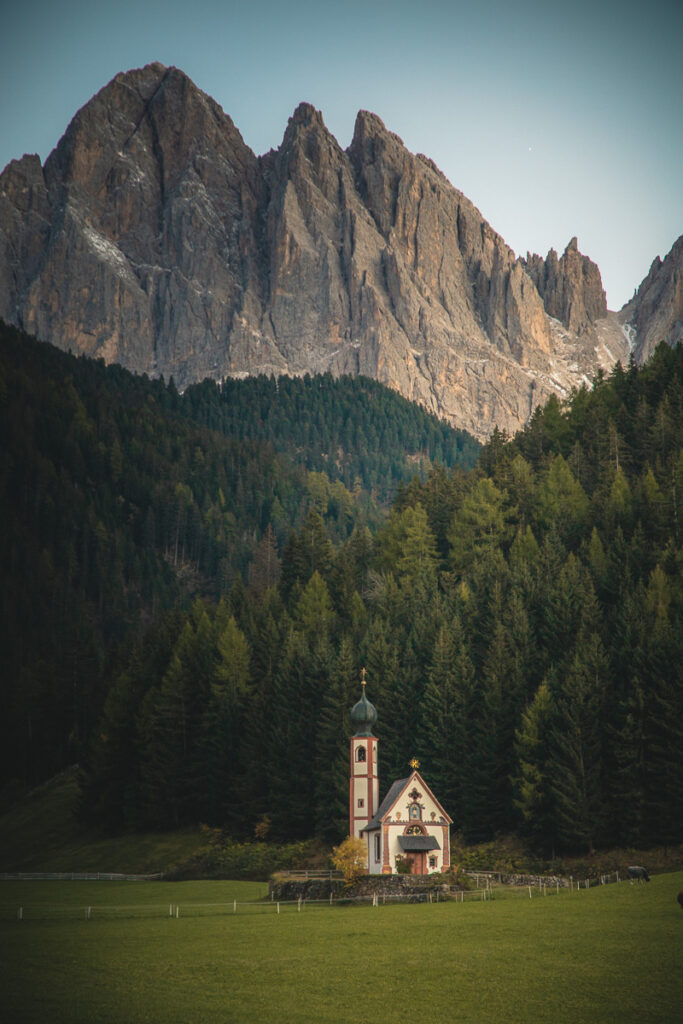
It takes about 45 minutes to get to the Val Di Funes area from Ortisei. After a long day of hiking, we chose to watch the sunset in this area. Here you will find some of the most beautiful churches.
Your first stop will be at one of the most photographed places in the Dolomites, the church of Santa Magdalena. Unfortunately, you cannot drive up to the famous viewpoint for this church, but there is a small parking lot close by, and from there you can hike 20 minutes uphill to the viewpoint.
You will need to get back in your car to drive to the next location. (You can walk between the two destinations, but it will take you about 30 minutes.
Your second stop will be the Church of St. Johann (on google maps this is listed as Kirche St. Johann in Ranui). This church has an insanely beautiful background. There is a wooden viewing platform close to the parking lot. You can visit the inside of the church itself, but it does cost money.
Personally, I think the views are best from the wooden viewing platform.
We stayed in the same Airbnb in Ortisei this night: Brand new Airbnb 2BR 2BA – $674 Total for 2 Nights ($337 each)
DAY 3 OF YOUR DOLOMITES ROAD TRIP
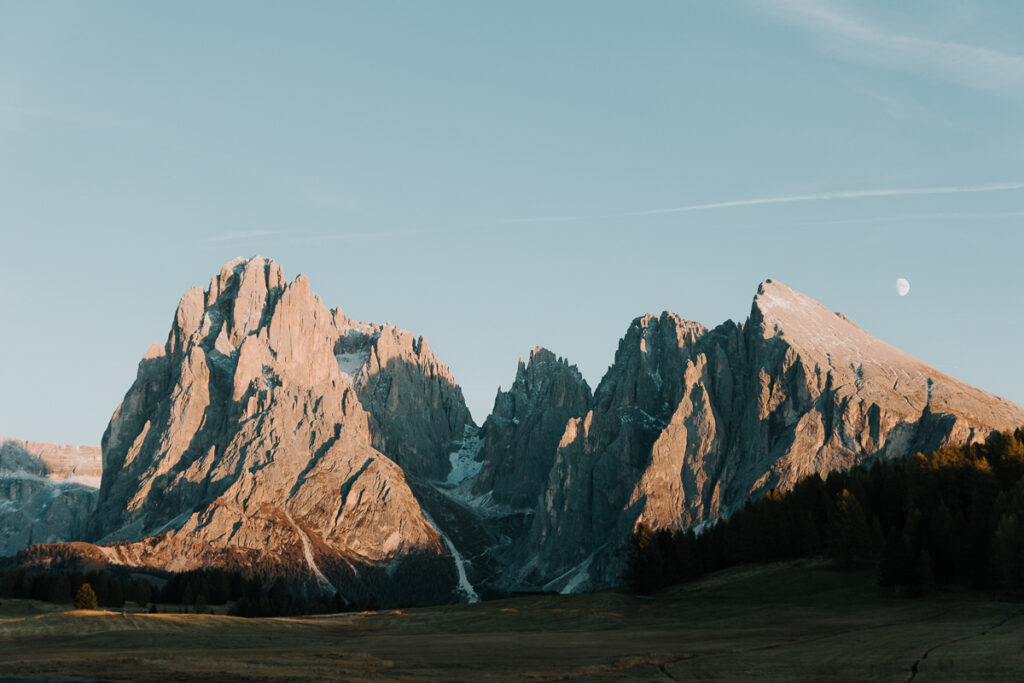
Stop 1: Gardena Pass
Our morning started off with a sunrise photo session at Gardena Pass as we headed towards the next area of the Dolomites that we would be staying in.
This is a super scenic mountain pass that connects Val Gardena with Val Badia ultimately getting you to your next destination of Cortina d’Ampezzo.
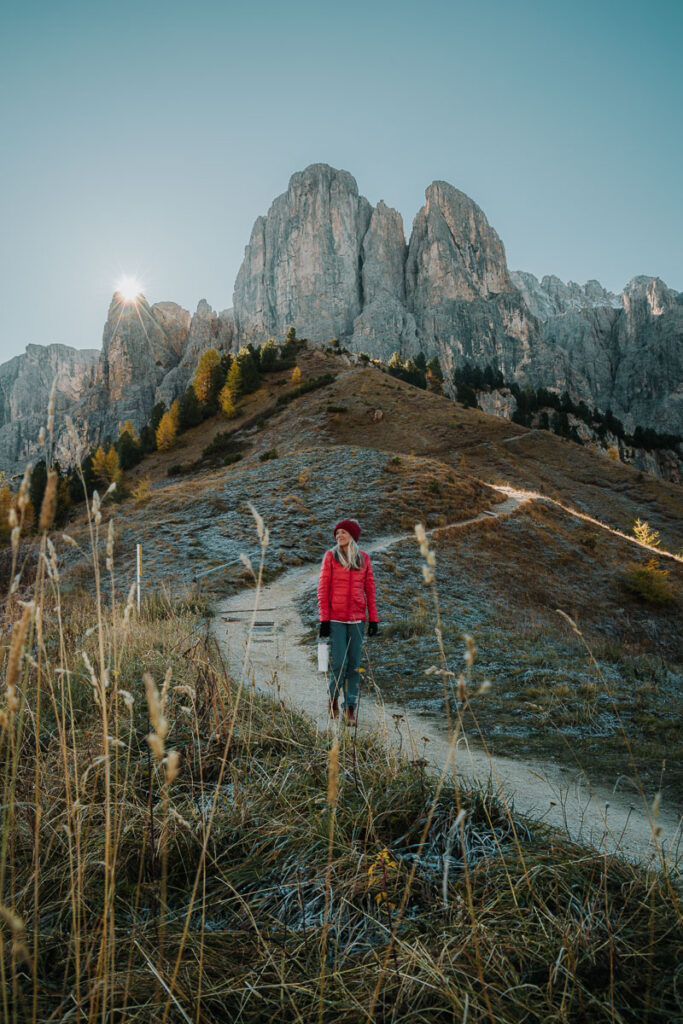
For sunrise, I recommend stopping at Rifugio Frara where you can park and reach an epic view of the Sella mountains.
This pass is beautiful both at sunrise and sunset, but if you are using my Dolomites road trip itinerary then I recommend stopping here for sunrise, so you can explore more places the rest of the day.
Stop 2: Lago di Landro
This is a beautiful lake that is right along the road. You barely even have to walk to get to it. Lago means lake and as you will see there are tons of lakes in the Dolomites region that you can stop at. Some require a hike, others are right off the road.
This is of course another beautiful lake. There is a trail that you can walk around the lake here if time permits.
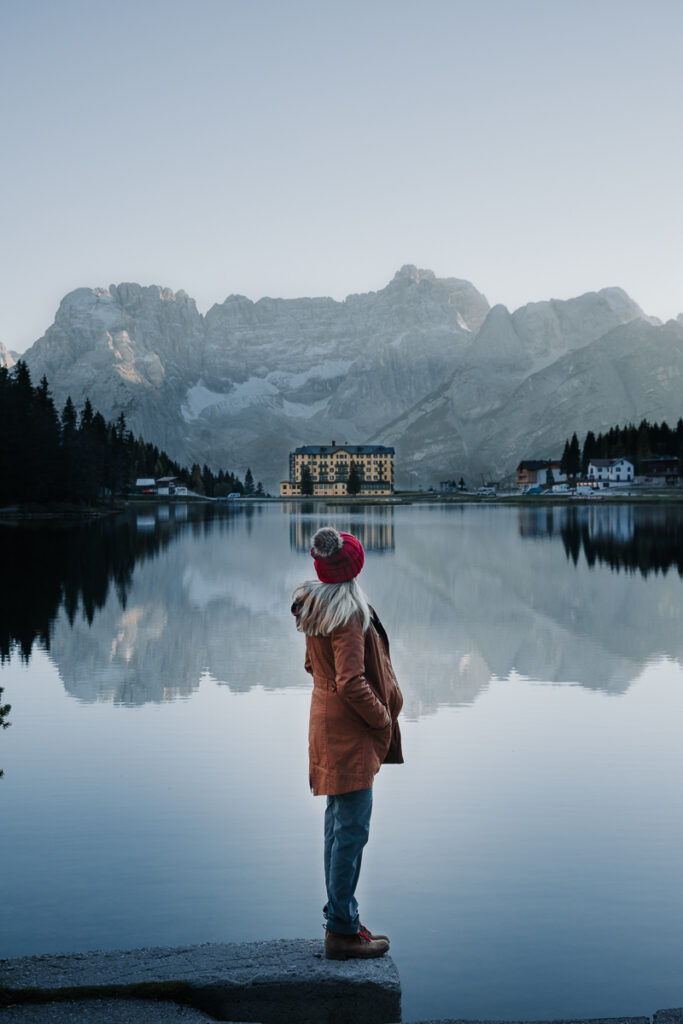
Stop 2: Lake Misurina
For sunset, we chose to go to Lake Misurina. There is a beautiful path along the lake that you can walk around as well. If it is cold, grab a cup of hot tea from the cafe right on the lake. In the summertime, you can also rent canoes and paddle out on this lake.
Optional stop: Lago di Sorapis
Instead of visiting the two lakes above, you could hike to Lago di Sorapis this day. We were pretty tired from our hike yesterday and waking up early this morning (plus being pregnant) so we decided to make today a bit slower.
This looks like a gorgeous hike and one day I plan to go back to visit, but for now, check out this article that gives you all the details on hiking here.
Your accommodations for the next few nights will be in the town of Cortina d’Ampezzo. Stay at: Chalet Falorie Airbnb 2BR 2BA – $527 Total for 2 nights
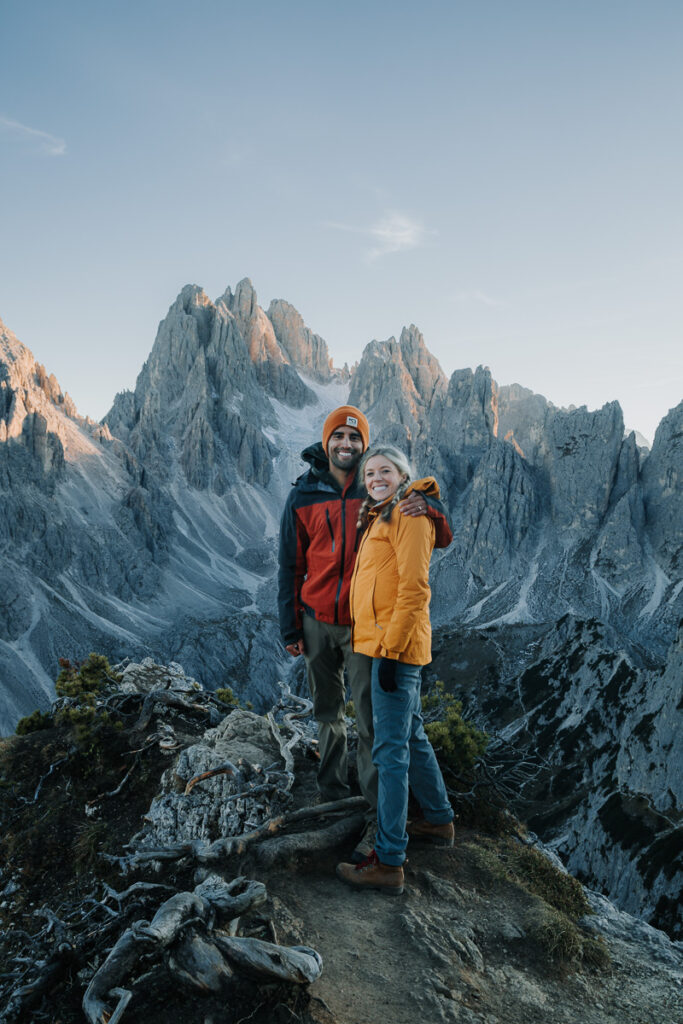
DAY 4 OF YOUR DOLOMITES ROAD TRIP
Today we decided to focus on some photography, so we chose a sunrise location and a sunset location for the day. In the middle of the day, we chose to head back to our Airbnb nap and edit some photos.
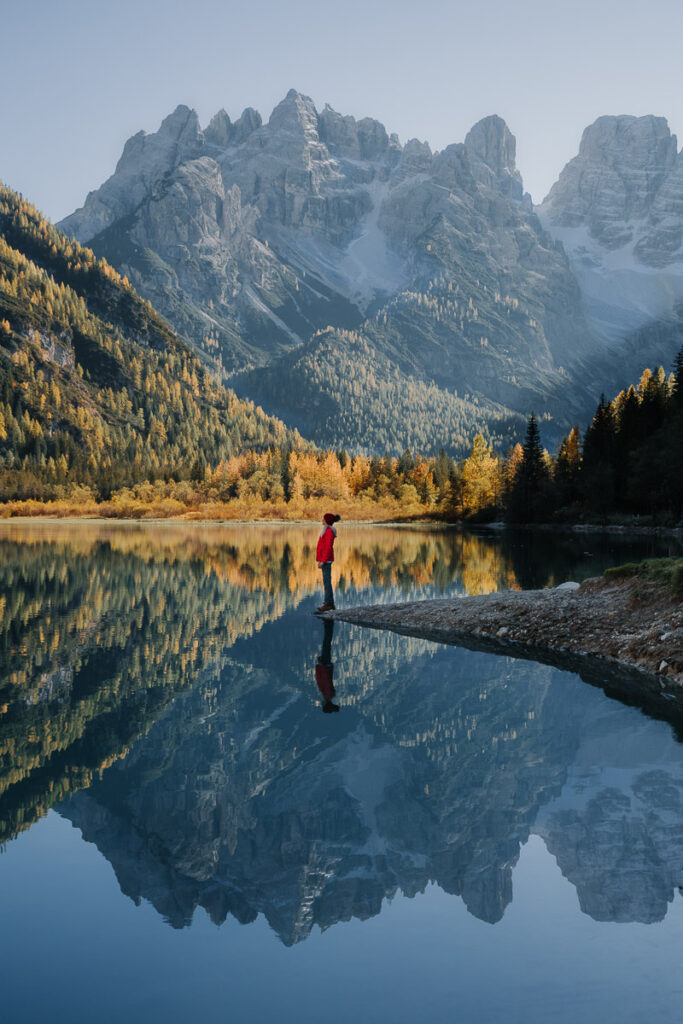
Stop 1: Lago di Antorno
Yet another beautiful lake that is right off the side of the road. We chose to go here for sunrise and were blessed with some insane colors. It was freezing in the morning, so make sure to dress appropriately.

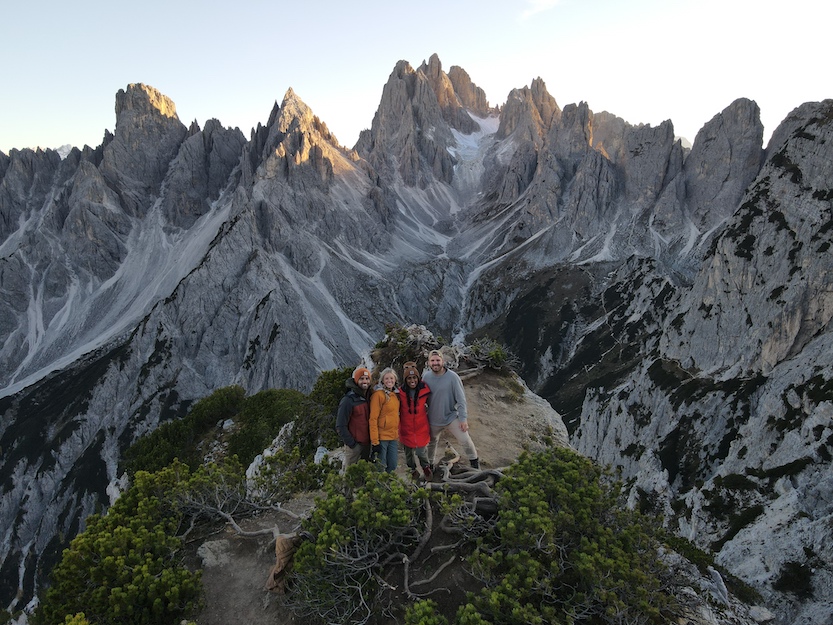
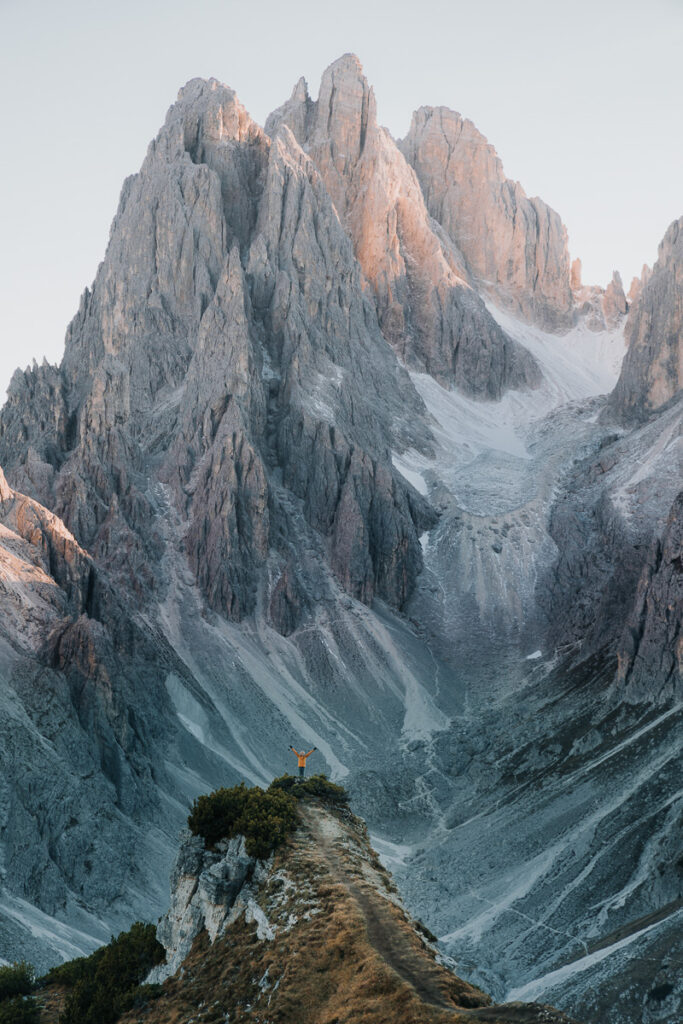
Stop 2: Candini di Misurina
For sunset tonight you will be hiking around the Tre Cime de Lavaredo area. You will be doing the hike to Candini di Misurina; however, if you don’t want to relax in the middle of the day as we did then you could add on the Tre Cime de Lavaredo loop hike.
The Tre Cime de Lavaredo loop hike is a 10km loop that I have heard is fairly easy. On this hike, you will see the three iconic peaks you probably see in a lot of photos. This hike as well as the Cadini di Misurina hike begins and finishes at Rifugio Auronzo. The Tre Cime de Lavaredo loop is best done counterclockwise
You will find multiple parking lots at this Rifugio; however, to get here you will need to pay 30 EUR to enter this park. It takes about 40 minutes to get here from Cortina d’Ampezzo.
If you don’t want to do this loop then I recommend the short hike to Cadini di Misurina. Personally, I think this location is more stunning and the hike is shorter. A win-win.
To get to this location, you will hike in the opposite direction of Tre Cime. You can check out my Youtube video for exact directions and what it looks like as it can be a bit confusing. Essentially look for signs marked trail 117. The path is a little discreet.
If you are afraid of heights this path may not be for you as it is narrow and there are some steep drop-offs, but it is beautiful once you reach the endpoint.
This place is truly awe-inspiring. It took us about 30 minutes to get here, it was an easy hike and we almost had the place to ourselves. It is a great location for sunset too! Just bring headlamps for your hike back out.
DAY 5 OF YOUR DOLOMITES ROAD TRIP
Your final day exploring the Dolomites! And maybe my most favorite location on this entire list. Today you will be visiting Lago Di Braies for sunrise.
Stop 1: Lago Di Braies
If you are staying in the town of Cortina d’Ampezzo then it will be about a 50-minute drive from here. I highly recommend arriving here before sunrise as the parking lot does fill up. This is one of the most popular lakes to photograph.
You will find tons of photographers here so if you want to get a good spot you will need to arrive early.
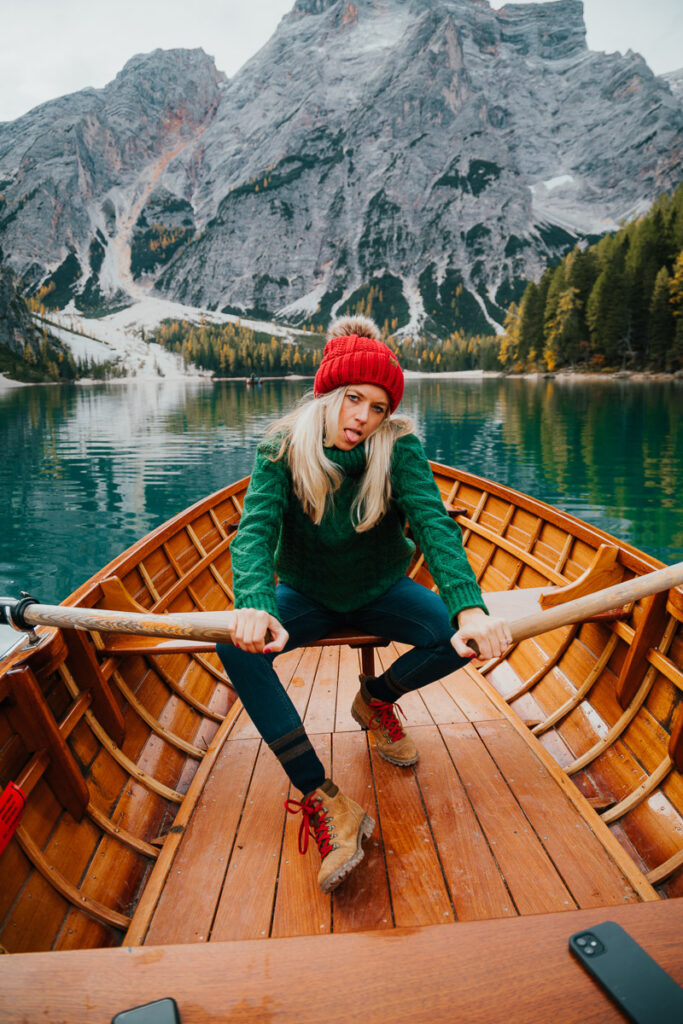
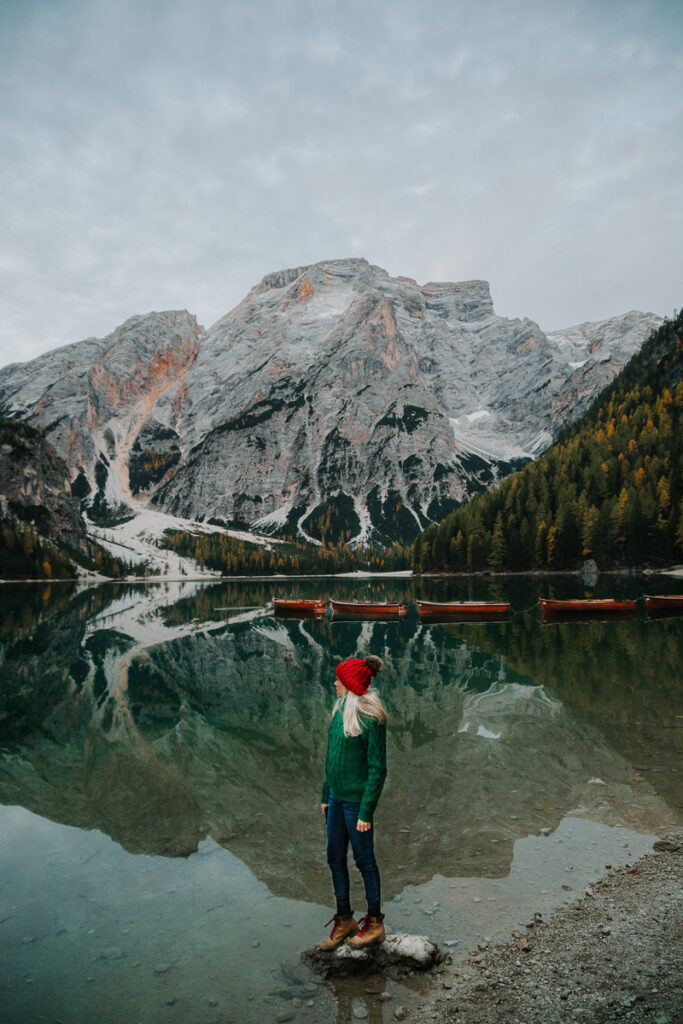
While here you can take a walk on the trail that goes around the whole lake or you can rent a rowboat to go out on the lake. I highly recommend renting one. Personally, I thought it was fun, romantic, and worth the photos.
The boathouse opens around 930am and costs €25 EUR for one hour, €15 EUR for every 30 minutes after that. The line did get really long, so again this is why I recommend arriving early.
If you get cold while waiting for the rowboats to open there is a little cafe within walking distance of the lake where you can grab some hot chocolate, coffee, and breakfast.
After you finish your time at Lago Di Braies it will be time to return to your starting point. For us, this meant driving back to the Venice airport and returning our rental car.
DOLOMITES PACKING GUIDE
If you are planning to visit in the Fall, prepare yourself for cold weather. The brisk air at these altitudes in the mountains will get ya. Below I have listed out some of my favorite gear to keep me warm.
BASE LAYER
It is always important to start with a base layer. When purchasing a baselayer you want to find something that is made out of Merino Wool as this will help wick away any moisture. Avoid cotton. My favorite long sleeve base layer tops and bottoms are from Kari Traa. It is important to have a top and bottom base layer.
[show_shopthepost_widget id=”4664809″]
MID LAYER
A mid-layer is another important piece to layering to keep you warm. Kari Traa again offers a great pullover as a mid-layer option. The Patagonia Los Gatos ¼ zip is another one of my favorites. I have it in brown.
[show_shopthepost_widget id=”4664812″]
OUTER LAYER
Your outer layer is extremely important for those bitterly cold days. I would ensure you bring a thicker coat as well as a waterproof layer. For a longer layer, I have the Sundowner Jacket from KAVU. For my waterproof layer, I went with the Marmot Precip Eco Jacket. Lastly, for extra warmth, I love my Arc’teryx Cerium LT Hooded Down Jacket.
[show_shopthepost_widget id=”4664819″]
SHOES
My favorite boot that you can hike in or just walk around town in is the Blundstone Classic 550 Chelsea boot. If you are looking for a sturdier boot, then I recommend the waterproof Danner Addrika Hiking Boot. And if you don’t like the ankle support then I recommend the KEEN Voyageur Hiking Shoe.
[show_shopthepost_widget id=”4664825″]
ACCESSORIES
These are some of my favorite must-have accessories to keep me warm while on the trails. My hands always get cold so I purchased these iphone compatible Icebreaker Sierra Gloves. Of course, you need to keep your ears warm. I have found the ultimate beanie that keeps you warm in the winter. And lastly, this has become my favorite day hiking backpack that is affordable and can fit everything you need in it for the day.
[show_shopthepost_widget id=”4664823″]
FINAL THOUGHTS FROM YOUR OUTDOOR LOVING GIRL
As always, never forget to follow the Leave no trace principles, so that we can leave the Dolomites a better place for the next people to visit. I hope you found this Dolomites road trip itinerary helpful for planning.
THE ULTIMATE 5 DAY DOLOMITES ROAD TRIP ITINERARY